August 2, 2016
Client Certificates at Biz: Step-by-Step Guide
How to configure 2-Way SSL (aka Client Certificate) at Biz in OSB

This post describes how to configure two-way SSL for outbound connections in Oracle OSB.
In other words, we’re going to make OSB calling a backend service that requires a client certificate to authenticate the connection.
If you’re looking for information on how to make OSB accepting client certificates, it is a wrong post then. That would be the inbound two-way SSL connections.
Why 2-Way SSL a.k.a. Client Certificate Authentication?
One-way SSL
With a standard SSL a client receives the server certificate, and can verify that it talks to the right server. Server usually authenticates the client with a user name and password (e.g. Basic HTTP authentication).
Potentially, any client that got to know the credentials can connect to the server, which can be an issue.
Two-way SSL
2-Way SSL enhances the security by demanding that the client provided its own certificate which must be known to the server beforehand.
For a potential attacker it is much harder to steal the private key than the username/password pair.
How it Works
The exchange between a client and the server is going like this:
- Client connects to a TLS server endpoint
- Server presents its certificate
- Client validates the certificate (checks it against a trust store or CAs)
- Server then presents a request for a client certificate
- Client provides the identity certificate
- Server validates the client certificate against a trust store
- Based on the client certificate, server may assign the request a user identity
- If both sides are validated OK, the connection is established.
From the above it is clear that server needs to have the client certificate in the server trust store.
The server team may generate the certificates for their clients and provide the certificate and the private key to each client. Client can also generate the client key pair on the client side or request it from a CA, and then provide it to the server for adding to the trust store.
Generating or Obtaining the Keypair
The keypair (private key + certificate) can be obtained from a Certificate Authority (CA), or can be generated. I will not go into the details of working with CAs. If you prefer to generate the cert, below are instructions that can help you (tip: don’t forget the extended attributes).
Importing the Keypair into a Dedicated KeyStore
While it is possible to have both primary identity keypair and client authentication keypairs in the same keystore, from operational point of view it is better to separate them, and store client keypairs in a different file.
(I’m assuming your private key is in client.key file and the certificate is in client.crt file, and both files are in PKCS12 format. If the format provided by your CA is different, you’d have to alter openssl commands below accordingly.)
Java’s keytool is able to copy keypairs between keystores, but it cannot work with the private key and certificate in separate files. So the first step we need to do is to merge these files into one keystore:
openssl pkcs12 -export -in client.crt -inkey client.key -out client.p12
Enter pass phrase for client.key: <Provide a password if any><Enter>
Enter Export Password: <Provide a password><Enter>
Verifying - Enter Export Password: <Confirm a password><Enter>
IMPORTANT! Provide a non-empty password for export, otherwise keytool later will fail importing this keypair.
As the output we now have a keystore in P12 format, named client.p12.
Import P12 Keystore in JKS Keystore
With Java’s keytool, perform the import:
keytool -importkeystore -srckeystore client.p12 -srcstoretype pkcs12 -destkeystore client.jks -deststoretype jks
Here the source keystore is client.p12 and the target keystore is client.jks.
The process will ask you for the password for the source keystore (use the one you provided during the merge into P12) and the password for the client.jks keystore. If the target keystore does not exist, it will be created.
Validate the content:
keytool -list -storepass <store password> -keystore client.jks
Keystore type: JKS
Keystore provider: SUN
Your keystore contains 1 entry
1, 17-Jun-2016, PrivateKeyEntry,
Certificate fingerprint (SHA1): D7:AA:33:B6:D5:95:F7:D7:1B:29:31:73:E9:BD:92:BD:48:80:70:0B
You see that the keypair entry is indeed imported, but is stored with an alias of ‘1’. This is not too descriptive, so let’s rename it:
keytool -changealias -alias "1" -destalias "csmf-ii" -keystore client.jks -storepass <store password>
Here “csmf-ii” is a name of the service. I use it as an alias to my key. Use a value fitting your backend service name.
If you repeat the list command above, you’ll see that the entry is renamed:
csmf-ii, 17-Jun-2016, PrivateKeyEntry,
Certificate fingerprint (SHA1): D7:AA:33:B6:D5:95:F7:D7:1B:29:31:73:E9:BD:92:BD:48:80:70:0B
Remember this alias, you’ll need it later to configure the mapping between the URL and the used certificate.
Create a PKI Credential Mapping Provider
The next step is to let WLS know about our custom keystore. To do that we need to create a new PKI credential mapper.
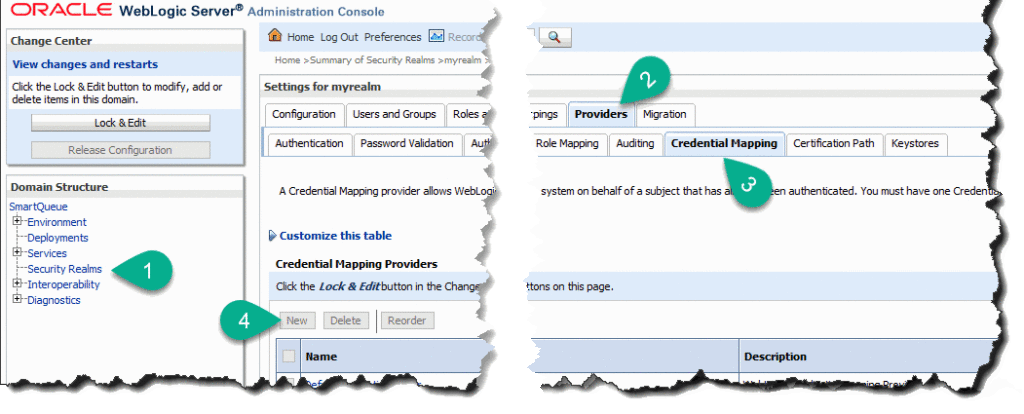
Navigate to the Security Realm - (myrealm) - Providers tab - Credential Mapping. Start a new session and click New:
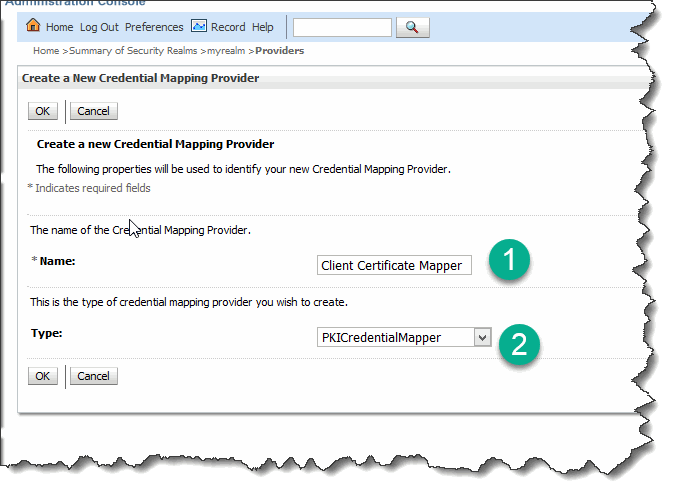
Name the new mapper with a descriptive name, e.g. “Client Certificate Mapper” and select PKICredentialMapper as the type:
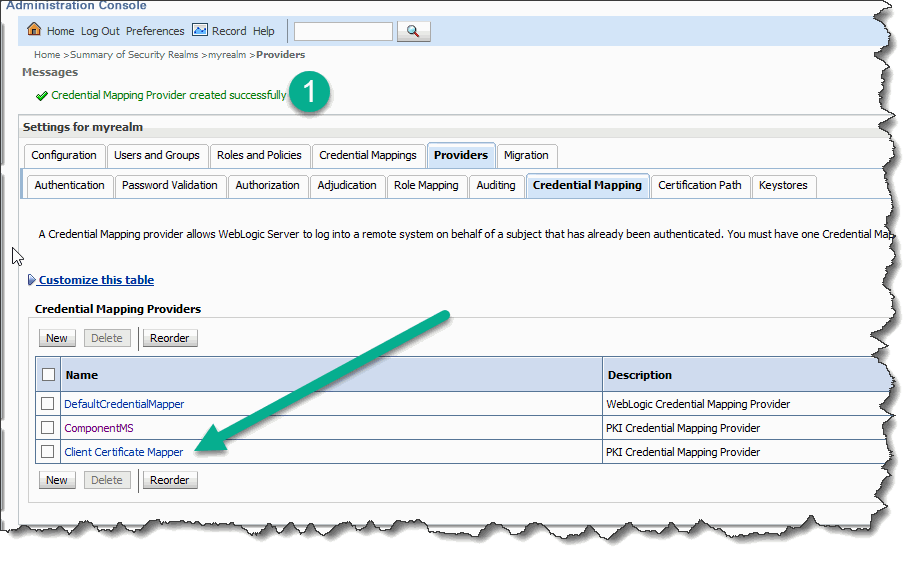
The new mapper is created, but not configured yet:
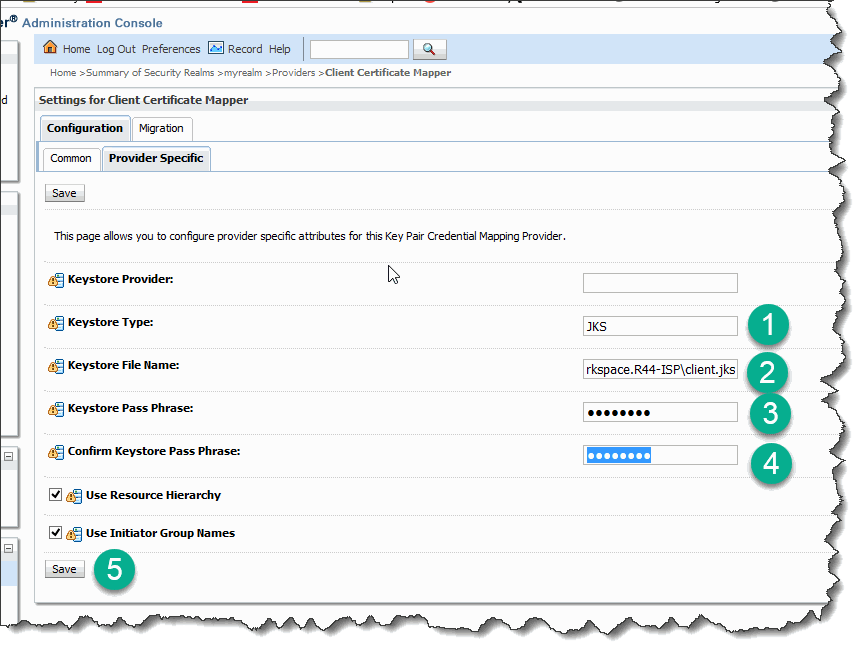
Click on its name and navigate to Provider-Specific tab. Set keystore type to JKS (this is a default), provide a full path to the client.jsk keystore and its password twice, and then save the configuration:
Activate the session.
The domain needs to be restarted now, all managed servers and admin, too.
OEPE Configuration
Now we need to make OSB services use this mapping.
It is not done in an intuitive way. I would expect the mapping attached to the Biz service (e.g. just like the Service Account credentials, for example). Instead, the certificate mapping is attached to a proxy that calls the Biz service.
For example, CSMF-II service has entry proxy (EP) that calls inner proxy (IP) that calls the Biz service. The certificate mapping then is attached to IP.
Making Keystore Available to IDE (Eclipse)
(If you’re using Oracle JDeveloper, the specific configuration steps will differ, but the overall process is the same.)
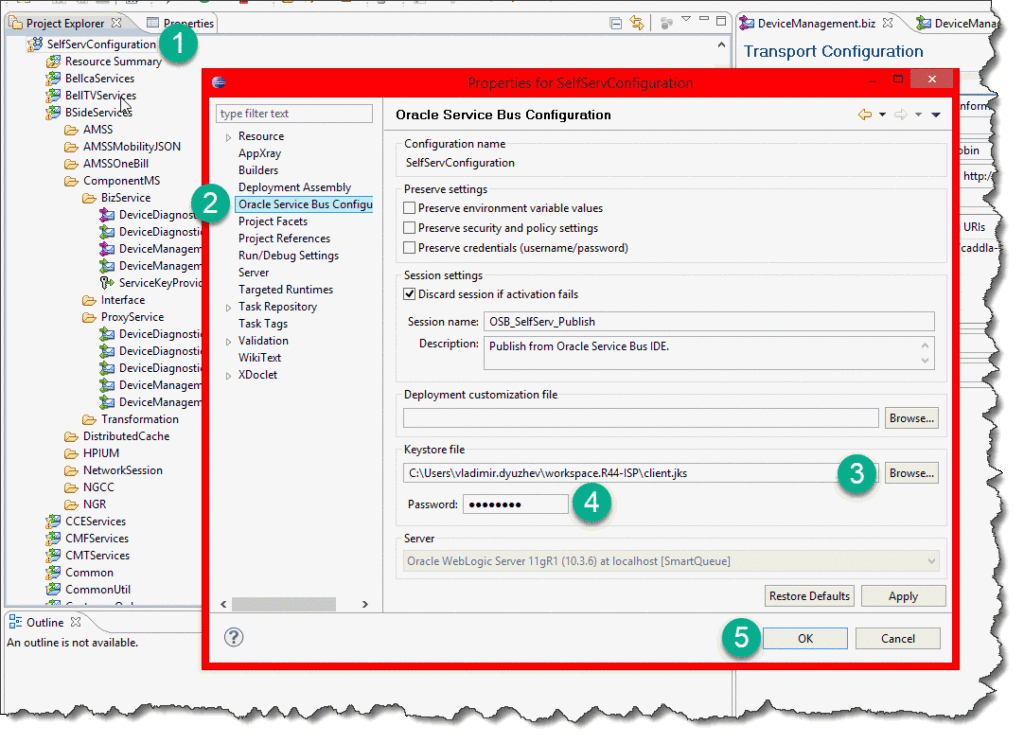
In Eclipse OEPE interface, right-click on the OSB configuration, select Oracle Service Bus Configuration entry, enter a location to the keystore file (must be the absolute path), provide the keystore password and click OK:
Create a Service Key Provider Resource
In OEPE sources, create a new resource of type Service Key Provider:

Select Keys = SSL. Don’t get alarmed by the “invalid service key provider” message - we just need to specify the right alias. Click on Browse button next to Key field:
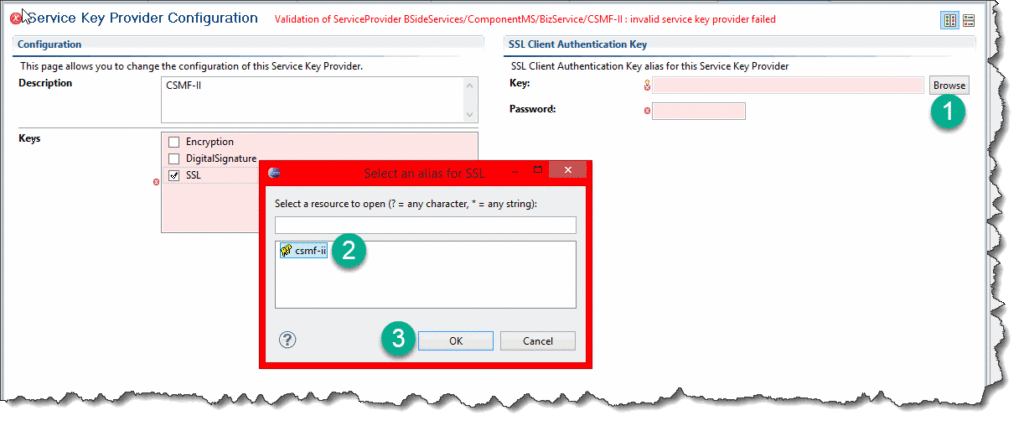
The dialog will list all the keypair aliases that we have in the keystore configured in OEPE.
(If Browse button is not available, or the alias list is not having your key, double-check the configuration - path and password - of the keystore.)
Provide the alias (not keystore!) password and save the resource:
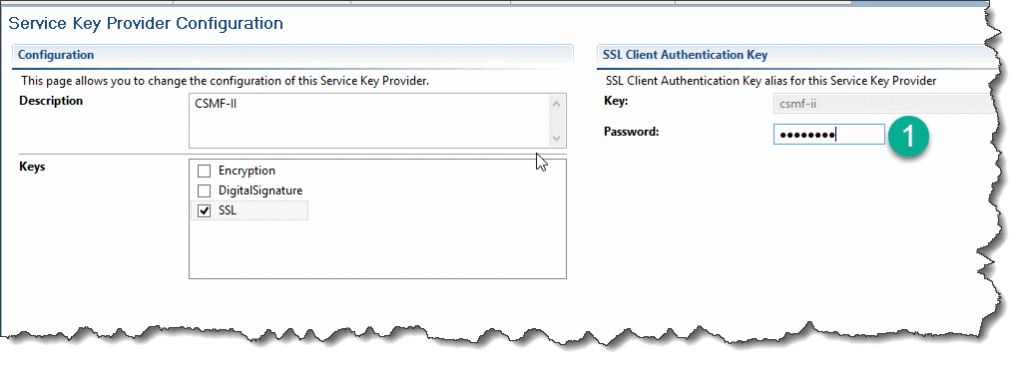
If everything is good, the resource is saved and shows no errors.
Refer SKP from a Proxy
Now we need to add a reference to Service Key Provider (SKP) from a proxy that calls our business service.
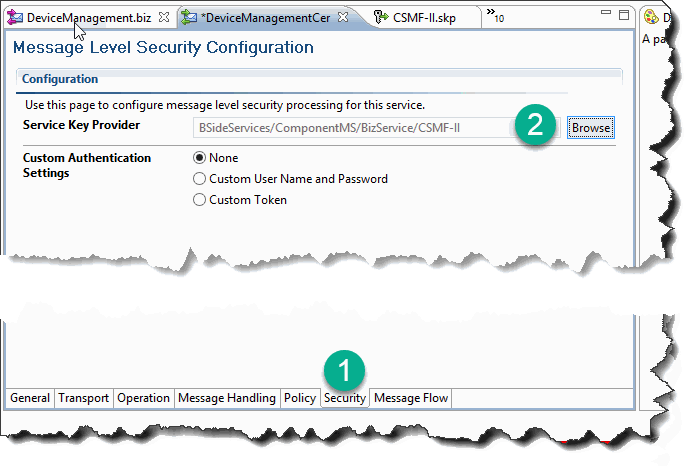
In the proxy service, navigate to the Security tab, click on Browse next to Service Key Provider field and select the corresponding SKP:
Set Authentication Type for Business Service
In the business service, set the authentication type to Client Certificate:
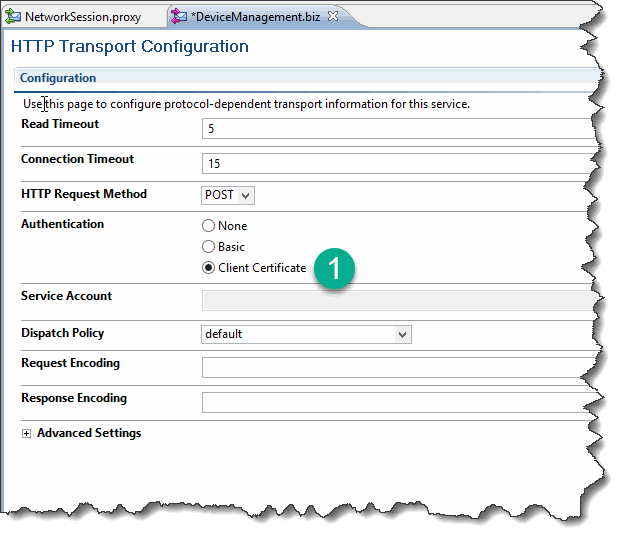
Note that this option can only be selected if the configured URL has HTTPS schema.
Done!
The configuration is complete.
Now you can try and test your service. Note, however, that if you’re using OSB console for testing, you should initiate the request from the proxy, not from the business service - otherwise your certificate won’t get used.
Another word of caution: the first request thru the configuration often fails. Probably some setup work for 2-way SSL takes too much time, and the request times out. Always try 2-3 times if you see a fault.
Happy 2-Way SSLing!
Addendum: Generate a Self-Signed Client Keypair
Generate Keypair
We can generate a client keypair using Java’s keytool application, but I suggest to use openssl to add so-called extended key attributes, namely a flag that the certificate can be used for client authentication. That flag may be checked by the server code, or by future more strict versions of Weblogic.
Also, for OSB11 limit the key size to 2048 bits, or Certicom won’t be able to use it.
OpenSSL configuration file
To create the keypair in one command and to add the extended attribute we need, prepare a file containting the following configuration:
[ req ]
prompt = no
distinguished_name = BSide2CSM2

[ BSide2CSM2 ]
commonName = BSide 2 CSMF-II
countryName = CA
localityName = Toronto
organizationName = Talon
organizationalUnitName = DCX
stateOrProvinceName = ON

[ myserverexts ]
extendedKeyUsage = clientAuth
The distinguished_name value (BSide2CSM2 in this case) must match the first section name.
Note the extendedKeyUsage value (clientAuth). That means we’re planning/permit to use this keypair for client authentication.
Save this file as openssl.conf (for example).
Generating the Keypair
Now execute the following command:
openssl req -x509 -config openssl.conf -extensions myserverexts -sha1 -nodes -days 3650 -newkey rsa:2048 -keyout client.key -out client.crt
Here openssl.conf is the name of the configuration file we have created above, and myserverexts is the name of the section in the configuration file that contains the extensions we need. This command also requests SHA1 signature. If your backend supports SHA2, this option should be removed (SHA256 is the default value).
After execution the current directory will contain two files:
- client.crt - Client certificate.
- client.key - Client private key. Keep it under strong protection.
Send the client.crt to the Server Team
Send client.crt to the server team to import into their server trust store.
When they did that, you can validate it by establishing a test TLS connection:
openssl s_client -connect host:443 -cert client.crt -key client.pvt
or, if you want to see some real response, you can use curl with the keypair:
curl -v -k -d @request.xml -H "content-type: text/xml" --cert ./client.crt --key ./client.pvt <URL>

About Me
My name is Vladimir Dyuzhev, and I'm the author of GenericParallel, an OSB proxy service for making parallel calls effortlessly and MockMotor, a powerful mock server.
I'm building SOA enterprise systems for clients large and small for almost 20 years. Most of that time I've been working with BEA (later Oracle) Weblogic platform, including OSB and other SOA systems.
Feel free to contact me if you have a SOA project to design and implement. See my profile on LinkedIn.
I live in Toronto, Ontario, Canada. ![]() Email me at info@genericparallel.com
Email me at info@genericparallel.com
